How to Remove a Cape

A: Removing a styling cape correctly is a crucial skill that separates professional hairdressers from amateurs. The goal is to ensure that all loose hair ends up on the salon floor where it belongs, rather than clinging to your client's clothing or skin.
Before you begin the cape removal process, make sure you've followed proper initial setup procedures. This means you should have placed a neck strip or salon towel around the client's neck before securing the cape. This barrier serves as your first line of defense against stray hairs making their way down the client's collar. Quality neck strips are designed to absorb moisture and catch fine hair particles that might otherwise slip past the cape's edge.
Take a moment to brush off any visible hair from the cape's surface using a duster. Work from the shoulders toward the center, gently sweeping away the bulk of the cut hair. This preliminary step significantly reduces the amount of hair that could potentially transfer to your client during the removal process.
2. Folding Technique
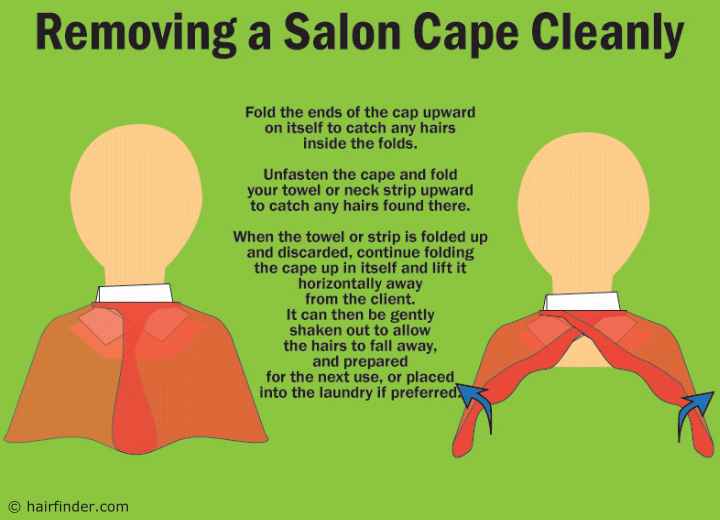
When you're ready to remove the cape, timing and technique are everything. Start by carefully lifting the back edges of the cape, bringing them up and over the client's shoulders. This creates an envelope effect that traps loose hairs within the folds of the cape’s fabric rather than allowing them to scatter. Think of this as creating a temporary container for all the hair clippings.
The key is to work systematically. Fold the sides of the cape inward first, then bring the back portion forward over the client's shoulders. This approach ensures that you're constantly containing the hair rather than simply moving it around. Many novice stylists make the mistake of trying to remove the cape in one quick motion, which inevitably results in hair flying everywhere.
3. Neck Strip and Cape Closure
Next, address the neck strip or towel that's been protecting your client's neck area. Before unfastening the cape completely, carefully fold the neck strip upward, rolling it in on itself to capture any fine hairs that may have accumulated there. These smaller hair fragments are often the most problematic because they're nearly invisible but can cause significant itching and irritation if they make contact with the client's skin.
When unfastening the cape's closure, whether it's a snap, velcro, or tie system, do so slowly and keep the folded edges secure with your free hand. Rushing this step is where many stylists lose control of the situation and end up with hair scattered across their client's clothing.

4. Final Removal
With the cape properly folded, you can now lift the entire bundle horizontally away from your client. The motion should be smooth and controlled. Keep the cape level as you move it away to prevent any trapped hair from spilling out prematurely.
Once you've cleared the client's personal space, you can gently shake out the cape over the salon floor, allowing all the collected hair to fall where it can be easily swept up. This final shake-out should be done with purpose but not so vigorously that you create what stylists call "the hair cloud", a swirling mass of fine hair particles that settle on everything in the immediate vicinity, including your client's freshly styled hair, their clothing, and even their face and hands.
5. Post-Removal Cleanup
After successfully removing the cape, take a moment to inspect your client for any stray hairs that might have escaped your containment efforts. A final once-over with a neck duster or clean towel can catch any remaining particles and ensures your client leaves feeling completely comfortable.
The cape itself should be prepared for its next use by giving it a thorough shake and checking for any remaining hair, or it may need to be sent to the laundry before being used again.
©Hairfinder.com
See also:
The best brands for salon capes
The best neck closure for a cape
The best material for capes