Halloween Hairstyles: Bride of Frankenstein
Previous page
There’s no way around the time it takes to wrap a roller set. Simply choose the roller size you want to use and begin. Practice will make the process faster, but in the meantime, be patient and work at your own best pace. Once wrapped, you can let the hair dry naturally or use a bonnet or hooded dryer to speed up the process.
Once the hair is dry and cooled (if dried using a hairdryer), you can carefully remove the rollers, aiming to keep the curls as intact as possible. For me, the next step is giving the curls a generous spray of hairspray (use your favorite spray, but try to find one with an ultra-fine mist for even coverage without wet spots).
At this point, I let the curls set for a short while (10 to 15 minutes) so that the hairspray is completely dry and the curls are well set before I start manipulating the hair. Once I'm sure there are no damp or sticky spots among the curls, it's time to proceed.
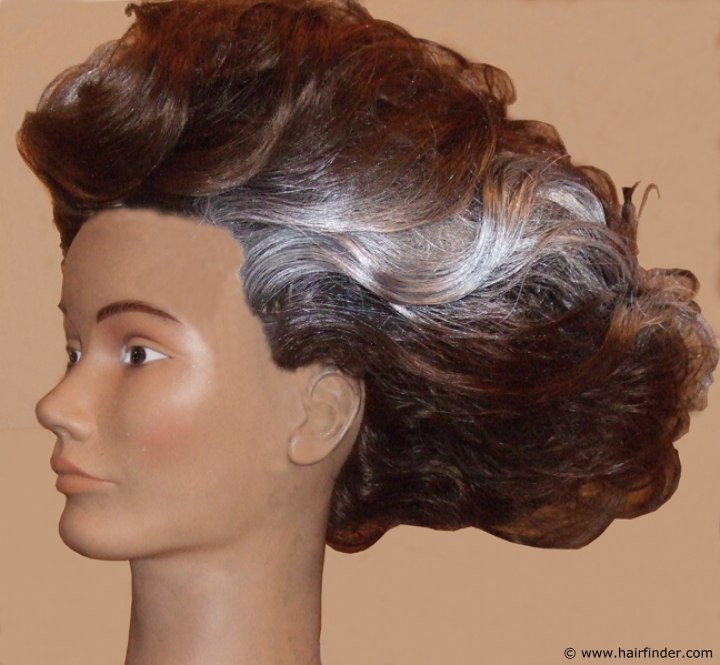
Since the Bride of Frankenstein style is primarily a back-angled beehive, we need a foundation in the core of the hairstyle that can support the weight of the remaining hair and to which we can secure the outer layers.
To achieve this, we take several curls at the crown of the head and brush them out (using your wide-tined brush and then styling brush) to separate and loosen the curls. We then separate this section of hair in half and backcomb the hair along the center parting. Start as close to the scalp as you can manage and gradually work your way out. Work around both halves of the section – backcombing – until you’ve created two teased-out masses of hair.
Using bobby pins, secure one half of the section's end to the base of the other half, and do the same on the opposite side. The goal is to create a secure bump at the crown, which will serve as a foundation for the rest of the style.
Work your way out from the center in a radial pattern; loosen the curls and backcomb them on the inside edges. Bring them loosely over the central bump. Use hairpins to anchor the locks as needed. Leave a curl on each side at the temple area out of this process, as we want to make a more specific arrangement with these curls.
Finishing Touches:
When we get to these curls, we want to ensure that we don't completely unravel them as we incorporate them into the style. Brush the curls out with the wide-tine brush, and backcomb the inside edge carefully to bring the curl into the rest of the style. However, make sure that the outer edge still maintains a distinct wavy line. Use the edge of your wide-tined brush or a pick to smooth out the surface somewhat, and apply hairspray liberally and pat to gently secure stray hairs and define the remaining curls.
The final touch for the look is to use the spray color (white) to follow the curl at the temples. This gives us the classic "Bride of Frankenstein" look that we all know and love.
{**Stylist’s Note: The temporary color rinse we used did dull down the coppery-auburn color of the manikin’s hair, but didn’t give as much of a dark shade as had been hoped for. In reviewing the steps we took, and knowing that we wanted to have the hair as easily workable as possible, we DID NOT shampoo the manikin beforehand. It is felt that residual styling product on the hair may have inhibited the coverage of the temporary rinse. This is reinforced by the fact that the backcombing and styling of the hair after it was dried led to a fine film of dark powdery color all over the workstation.
It is therefore suggested that you make sure to shampoo your hair before following these steps for yourself.}
©Hairfinder.com
See also: Disco Diva hairstyle for Halloween