Mushroom or Bowl Cut

A: The classic mushroom cut or bowl cut has made a surprising comeback in recent years as a stylish, gender-neutral option that works for various hair types. This iconic hairstyle features a distinct weight-line that circles the entire head, typically positioned at or slightly above the ears, creating that characteristic rounded silhouette.
Before we begin cutting, it's important to understand what makes this haircut unique. The bowl cut creates a strong, circular weight-line around the head, with the hair typically combed forward and down. You can style it with a center part for a classic look, or with no discernible parting for a more contemporary feel. The weight-line serves as the foundation of the entire cut, with the hair below typically layered to create shape and movement.
Preparation
Start with clean, damp hair that's been thoroughly combed to remove any tangles. You'll need sharp professional hair scissors, sectioning clips, a fine-tooth comb, a water spray bottle to keep the hair damp, and a cape to catch falling hair.
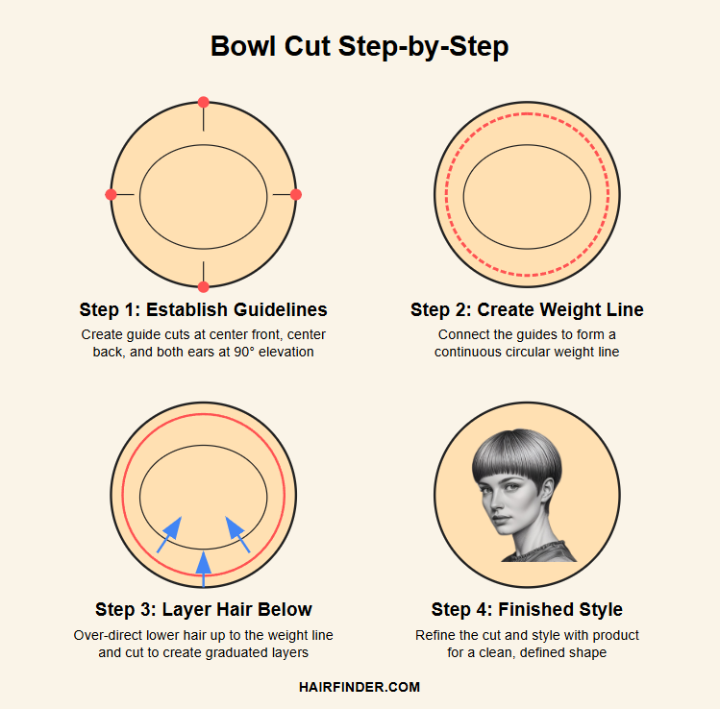
1. Establish Your Guidelines: Begin by determining where you want the weight-line to sit. This is typically at or just above the ears, but can be adjusted based on personal preference. Create initial guide cuts at four key points: center front, center back, and at both ears. These guides are cut by lifting the hair to a 90-degree angle from the head and cutting straight across at your desired length.
2. Create the Main Weight-Line: Working methodically around the head, connect these four guide points to form a continuous weight-line. Take small sections (about an inch or 2.5 cm wide) and cut them to match your guide lengths, maintaining the same elevation throughout. The resulting weight-line should form a perfect circle around the head when viewed from above.
3. Layer the Hair Below: For the hair beneath the weight-line, you have two effective options.
First method: Over-direct each section of hair below the weight-line up to meet the established cutting line. Hold each section at a 90-degree angle from the head, comb the lower hair up to meet this point, and cut it to match the weight-line. This creates elegant, deeply angled layers that blend seamlessly with the upper weight-line.
Second method: Create a second guide at the very bottom perimeter of the hair, usually near the neckline. Starting at the center back and working toward the front on both sides, cut the hair to create a smooth transition between this lower guide and the upper weight-line. This requires cutting at the appropriate angle to ensure a natural gradient between the two points.
4. Refine the Cut: Once the basic shape is established, go back around the entire head to check for any uneven areas or stray hairs. Pay special attention to the weight-line to ensure it's perfectly even and symmetrical. Make any necessary adjustments to perfect the circular shape.
5. Style the Finished Cut: After cutting, blow-dry the hair using a round brush to enhance the shape. For a classic bowl cut look, direct the hair forward and down, smoothing it with a flat iron if needed. Apply a light styling product to add definition and control any flyaways. A matte pomade or light-hold wax works well to maintain the shape without making the hair look greasy.

Regular maintenance every 4-6 weeks is recommended to keep the distinctive shape of this cut. Between professional trims, you can carefully trim just the hair that falls over the ears and at the nape of the neck to maintain the clean lines of this hairstyle.
Like any haircut, practice makes perfect. If you're cutting a bowl cut for the first time, consider starting with a slightly longer length than your end goal to leave room for adjustments.
©Hairfinder.com
See also:
How to cut a bowl cut for boys
Haircutting angles and elevations
Clipper cutting techniques