How to Tie a Bandana

Bandanas are simple, yet versatile tools for any woman’s accessory collection. They’re more casual versions of a scarf, and when properly applied to a given situation, they can replace several different hair accessories.
Since they are usually made from cotton fibers, they are absorbent and can take a wide variety of colors and patterning techniques, so that you can find bandanas in nearly any color you can imagine, as well as a wide range of designs and even character and themed styles.
There are also bandanas made of silk or polyester satin, and a lot of people like them because they are so beautifully shiny and smooth. These bandanas are less absorbent or not absorbent at all, and are worn for looks rather than practicality. This type of bandana is more difficult to tie and keep in place due to the slippery fabric. But even with this drawback, many still find it worth the effort to wear a shiny bandanna.
They were used to carry dry goods and small shopping items, carry lunches and foodstuffs by workers in various industries, and who can forget the iconic image of the hobo with all his belongings tied up in a bandana which was then secured to a stick which he slung over his shoulder.
Today, we don't typically rely on bandanas for more than fashion accessorizing, but they are still versatile in that role. So let's take a look at the different methods of tying bandanas to wear on the head.
Headband or Alice Band
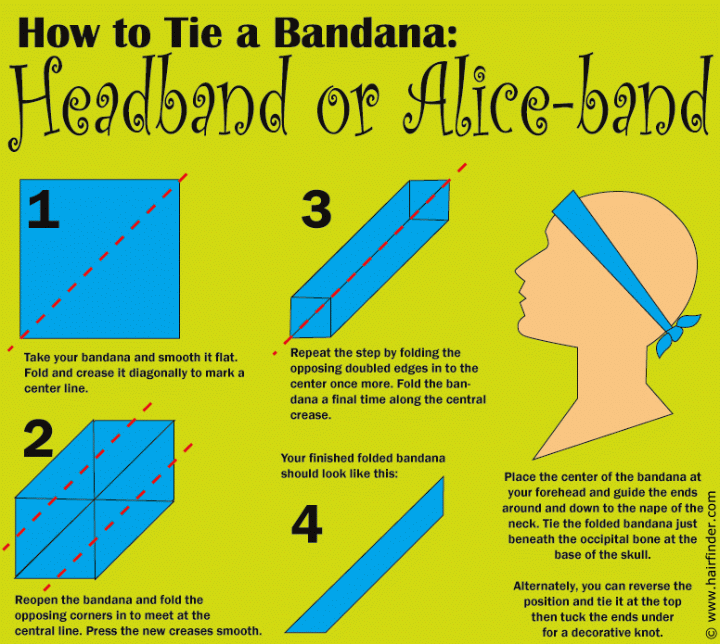
One of the simplest and oldest uses of bandanas is as a headband, tied to keep the sweat from the eyes and the hair out of the face. The conversion of the regular bandana shape into a headband/Alice band is much simpler than many expect. However, there is one tip that many people never think of on their own which can make a big difference in the finished look.

Step One:
Spread your bandana out on a flat surface and smooth it out. Fold the bandana diagonally and create a triangular shape. Smooth along the folded line to crease the fabric.
Step Two:
Reopen your bandana and take the ends you previously brought together and bring them to the central crease. The points of the opposing corners should meet in the center. Smooth the newly folded edges to crease them and allow them to lie flat.

Step Three:
Continue the folding process by halving the folded fabric on either side of the central crease and bringing the folded edges into the center. If you have an extra-large bandana, you can repeat this step as many times as needed to get the desired width of the finished band.
Step Four:
Fold the outer edges of the bandana one last time along the central crease. You can now place the center of the bandana/headband at your forehead and draw the ends around to the base of the skull, under the hair for an Alice band, or simply draw the ends straight back along the tops of the ears to form a traditional headband configuration.
Note: if wearing the bandana as an Alice band, you can also tie the bandana with the knot at the top of the head and tuck the ends under for visual appeal. Also, if tying the bandana under your hair is too difficult, you can tie it at the top of your head, pull the bandana down around your neck, turn it so that the knot is in the back, and then lift it back up into place.
Continue reading ...