Eyebrows: Tweezing and Shaping (2)
Previous pageNatural:
The natural brow shape is just that, a cleaned-up version of the brows with which you were born. The brows are groomed to remove any signs of a uni-brow, and usually trimmed lightly to make sure the hairs of the brows are all even in length. The brows may be made thinner, but they are generally left in the natural shape in which they’ve grown.
The natural brow is a perfect starting look for young women and girls who are concerned about their brows being too unruly, and for those women who favor a “natural look” in their make-up and styling.
Today’s rounded brows are a far cry from the pencil-line-thin version of twenty years ago. In many cases, the natural brows were completely shaved off and re-drawn to the desired shape and position. Unfortunately, the placement and precision was often plagued by human error and some women walked around looking permanently startled.
The rounded brows of today’s woman are executed in much the same way as the ‘natural’ brow, simply groomed to make the hair of the brows even in length, and to ensure the appearance of two, separate brows. However, the round brows go further, by gently reshaping the brows to form a gentle arc over the eye. The round brow is ideal for women with sharp, angular features in order to add some softness and balance.
Arched:
The arched brow is another look that has a history. It was initially devised to create a dramatic look in eye makeup. To this end, there have been literally DOZENS of arched eyebrow looks, with varying angles of ascension from the bridge of the nose, and a range of arcs and termination points on the outside edge.
Today’s arched brow is more modest, but still dramatic. It offers a woman the chance to have a dramatic eye without feeling like the evil queen in a Disney film. We’ll offer you tips on the “perfect arch” later.
Getting Started:
While it may seem like common sense, a lot of women don’t think about the fact that for the best results, you should start with a freshly-washed, completely dry face. Use your favorite facial cleanser, and gently pat the skin of the face dry with a clean towel, then allow the face to fully dry on its own. Making sure that the brows are clean and dry means that you’ll be better able to get a grip on them for removal regardless of the method you choose to employ.
Before you choose the specific shape you want for your brows, go ahead and to the basic grooming tasks. Use your brush and comb to comb the brows up and look for overly-long hairs or excessively coarse ones. If the hairs seem uneven, use your scissors to trim the hairs that extend beyond the ones next to it. By combing/brushing the hairs up first and trimming, then down and trimming along the bottom edge as well, you’ll give yourself a groomed finish, without risking creating any gaps in the brows by trying to cut the hairs with a scissors-over-comb method.
Next, check for hairs between the brows – the dreaded uni-brow – and remove them. You can do this by using your tweezers, or using a wax strip. For ease and convenience, many women prefer the wax, since they take all the unwanted hairs at once.
At this point, it’s time to choose your shape. Whether you want them natural, rounded or arched, you use the same techniques. Starting on the outer edges, remove the hairs that you don’t want. Just remember that if you’re working on the bottom edge, brush all the hairs of the brow upward, and when you work on the top edge, brush the hairs down. This helps you avoid removing hairs you don’t want removed and gives you more control – especially when using wax strips.
{PRO TIP: When you’re using the premade wax strips to shape your brows, there’s a neat trick that will make things much easier for you. Hold the pair of strips (stuck together) over your brow and take a Sharpie or other fine-point marker and draw the line of the shape you want for your brows – arched, rounded, etc. Then take your scissors and cut the strips along this line. You can use the bottom half to shape the underside of the brow and the upper half to do the top. Since the strips are stuck together, when you separate them, you have mirror images of the cut so they’ll be perfect for the two eyes. You’ll still want to be careful, but you’ll have a much easier time of shaping the brows as you desire them.}
The Perfect Brow:
As mentioned earlier, there is a commonly accepted formula to create what is felt to be the perfect eyebrow shape. It is an arched look that is customized for your face. Here are the how to's for this “perfect brow”:
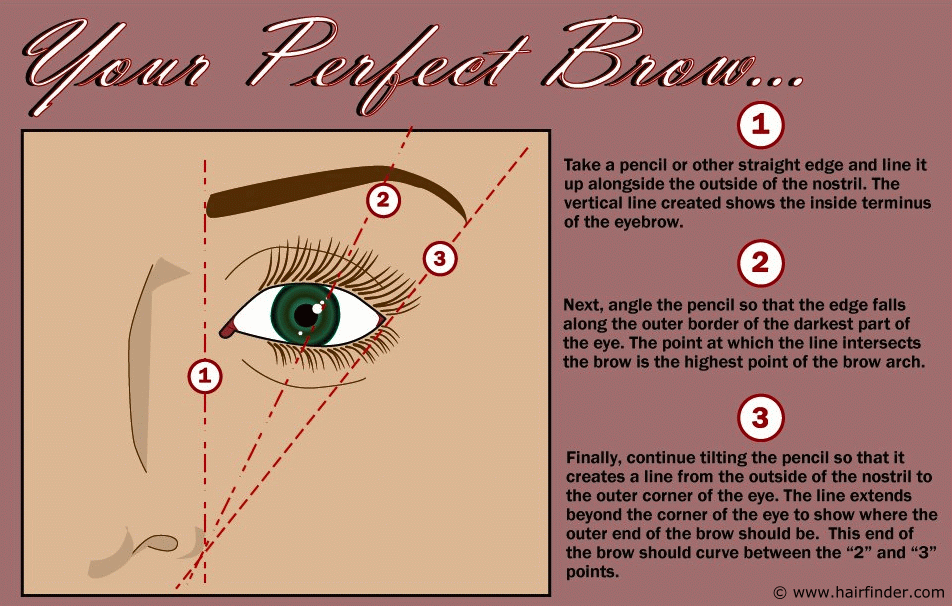
Look straight into a mirror and hold a pencil against one nostril. The point where the pencil comes in contact with your brow is where your eyebrow should start. Remove the hairs between the eyebrows.
Get the right arch by angling the pencil to the outer side of your pupil, so that the eraser end is at the side of your nostril and the top is just past the middle of your eye. The spot where the pencil hits the eyebrow is where the top of the arch should be, about three-quarters of the way out. Create a line that tapers upwards to this point.
Next, angle your pencil so that it lines up with the outer corner of the eye. The point where it hits the eyebrow is where the eyebrow should end. Of course, it should taper slightly and curve downward.
Finally, finish the brows by using your eyebrow pencil to fill in the brows. Remember to use light, short strokes to create a feathered effect rather than a hard, solid line.
©Hairfinder.com
See also: More about make-up