Lady Gaga Make-Up Look

I often have to disappoint my questioner when I reveal that the hair or the look in question is a wig or is computer-generated. The wig part is usually easier to accept, since a person may find an inexpensive wig similar to one Lady Gaga has worn. The CGI part of the equation usually means that the individual is left feeling dejected.
Defining Gaga
Lady Gaga’s many looks all have a common ideal: they are HIGH GLAM. The styles of her hair and make-up are more artistic expressions than esthetic enhancements. From false lashes made of feather to metallic appliqués adhered to the face, Lady Gaga wears her fashion as an extension of her creative sense – and she rarely does anything by halves.

Bad Romance:
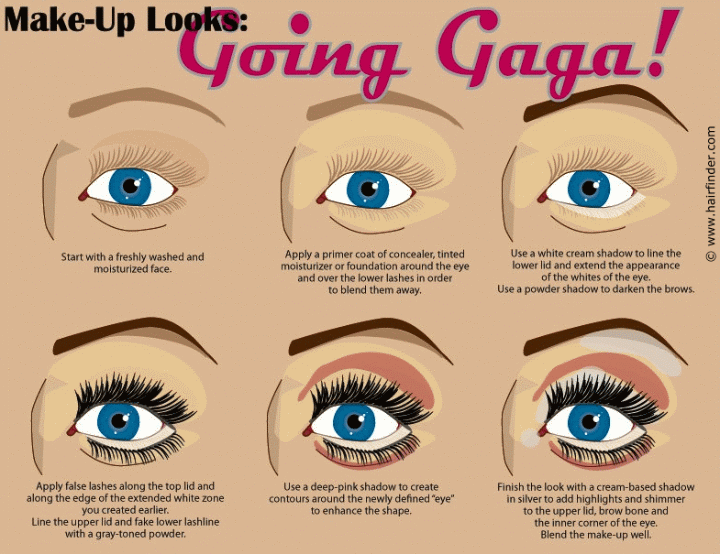
The video for “Bad Romance” features a variety of looks, but the one with which we will concern ourselves here is the look Gaga sports in the bathtub scene. It focuses heavily on the eyes, and in fact, her eyes in the video are computer enhanced to appear significantly larger than they really are with a disproportionately large iris. While we cannot replicate this look exactly, there are make-up tips that will allow us to create the look of a “bigger” eye.
As usual, we begin with a freshly washed face with an application of your favorite moisturizer. In case you have by chance forgotten why we do this, it is because the moisturizer helps to even out level of moisture in the skin and prevents the skin from drinking up too much of the moisture of liquid and cream cosmetics, allowing them to be applied more smoothly.
Apply a primer coat around the eye using a concealer or foundation only slightly lighter than that used on the rest of the face. The goal here is to flatten out the normal contours of the eye socket so that we can create a new shape in a slightly altered location. When applying the primer coat along the lower lid, go ahead and cover the lower lashes. We will be making them less visible as we go along.
Take a deep brown powder shadow and a thin brush and fill in the brow, creating an increased arch to give a dramatic look to the eye. Next, we will enlarge the white of the eye by using a white cream shadow color to line the lower lid and extend the white area in a curved line along the bottom edge of the eye. Make the line wider as you move to the outer corner of the eye and thinner as you move to the inside. You should basically increase the size of the “eye” by about 25%.
Our next step requires the application of false eyelashes. This part can be tricky so take your time. You will want to test the eyelash adhesive well ahead of time, by applying a small line along the inside of the bend of your elbow. Do this a couple days before you plan to use the lashes for real. This will give you time to know whether there is any sensitivity to the adhesive and avoid a painful and potentially dangerous reaction to the glue.
When you’re ready, apply a small line of adhesive to the back of your hand and touch the lashes along the line to coat the base weft of the lashes. Prior to applying the glue, you should hold the lashes to the eyes and make sure they are proper width. Cut them if necessary. After the glue is applied, let them sit a few moment to allow the glue to become tacky (sticky) then carefully apply the upper lashes along the upper lid’s lashes to increase the thickness and lushness of the upper lashes.
Carefully apply the lower lashes along the line of the white area you created earlier. This helps to reinforce the illusion of the larger eye area. Line the eyes – both upper and lower lids along the new lash lines using a charcoal gray powder and the fine-tipped brush. If you have to use a liquid or pencil, be sure to make a clean line and lightly smudge it after allowing it to set for a moment.
The next step is creating the new contours that will encourage the idea that the eye is more bulbous and rounder and larger still. Use a dark pink shadow (either a cream or shimmering powder) to place curved contours around the upper lid (arcing over the crease and onto the brow bone) and under the lower lid in a slightly more shallow curve. The outer corner of the upper contour should be slightly thicker, as should the lower contour’s outer end.
The last step in the contour phase is the highlighting. Using silver cream-shadow with a high-level shimmer factor, cover the upper lid along the line of the contour and work down to the line of the upper lashes. Apply a highlighting swath along the underside of the brow to give a pronounced brow bone, and place a smallish dot of silver at the inner corner of the eye for balance. Use a soft brush to blend the color and contours gently without blurring them completely. Finally, add an extra touch of silver directly to the center of the upper lid to make the eye really stand out.
©Hairfinder.com
See also: More about make-up