How to Cut a High and Tight
There has been an increased interest in military-inspired haircuts for men that have been around for generations. Specifically, we're going to discuss the cut referred to as the "high and tight."
The "high and tight" style is a standard military look, commonly seen in the Marine Corps. However, there are variations of the style that have only subtle differences across all branches of the service. Examining this military style can be useful and interesting to understand its origins. This and other military hairstyles are governed by the military's directives regarding "Uniform and Insignia."
High and Tight
I talked with friends who were previously in the service (Marines) and asked them about the "high and tight" cut and its origins. They all essentially admitted that they had no concrete citation on the subject, but they believed that tradition played a significant role in the style's popularity. This belief stemmed from the fact that after the initial "induction cut" and upon completing Basic Training, the restrictions on hair appearance were reduced. However, depending on the group one served with, peer pressure remained a strong motivator.
The general consensus was that following the guidelines of the regulations, having the hair maintain a "tapered appearance" where the "outline of the soldier's hair conforms to the shape of the head" seems to require a very short cut. Additionally, the variation in hair textures and wave patterns would necessitate shorter hair for some individuals to achieve a similarly "neat" appearance. This resulted in some soldiers needing more severe cuts, which led others to imitate these cuts to avoid "competition."
Of course, this is all speculation, but it does seem logically sound in its own way.
How to Create the High and Tight Haircut
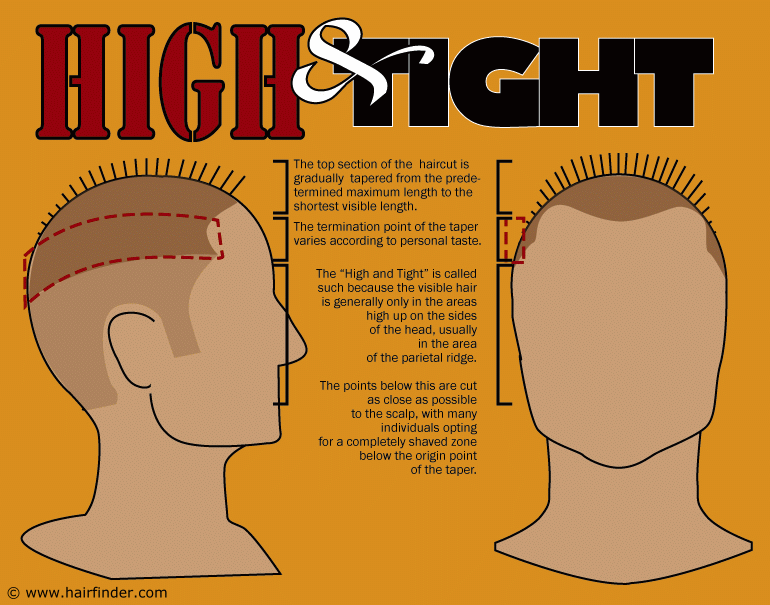
The High and Tight is essentially a clipper cut. It shares similarities with the "high top fade" and "buzz cut" styles. The crucial area to focus on is the parietal ridge, which experiences the most significant change in length. Below this point, the hair is trimmed to the shortest possible length.
The "High" part of "High and Tight" (with "tight" referring to the shortness of the hair) originates from the positioning of the tapering, where the only length of the hair remains on the top of the head. Even in its longest areas, a "High and Tight" style will typically not exceed 3/8 to ½ inches, and it may be shorter depending on the hair's texture and wave pattern.
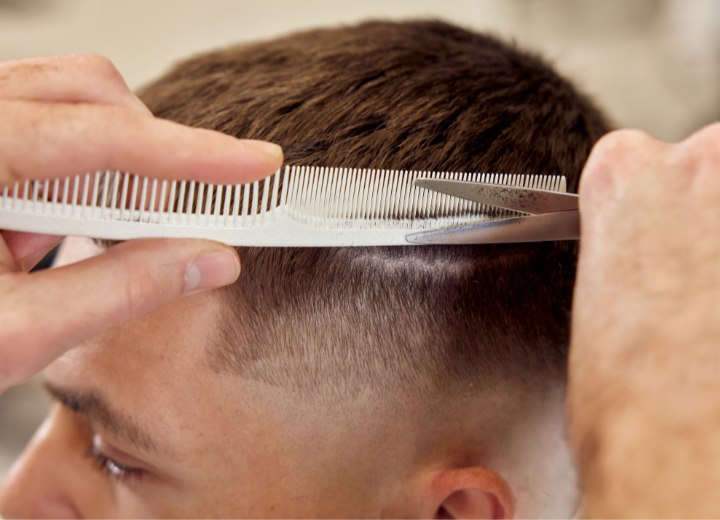
An experienced barber, who frequently performs this particular cut, can usually create the desired look freehand or using the clippers-over-comb technique. However, if you intend to do it yourself or seek assistance from a non-professional, you can simply use clippers and align the guides from the shortest length to the guide for your desired longest length.
Start cutting the hair using the guide for your longest desired length. With this guide, cut all the hair to the length of the guide, then remove the guide and cut the lower portions of the scalp to the middle of the parietal ridge with no guide to get the hair as short as you possibly can. If you have a trimmer that has a smaller length setting than your bare clippers, you can use it on the lowest portions of the scalp to reinforce the tapering effect, if desired.
Now, at the "transition zone" place the next longest guide on your clippers and cut upward around the head, stopping before you get too far onto the top of the head. You will want to have decided your "top section" before you start this process, so that you can have it in mind where to stop.
Continue changing out your guides, going smaller and smaller, and working around the scalp. Always stop short of your previous stopping point along the top, so that you maintain the tapering effect. Once you’ve worked your way through all the guides, you can take a fine-toothed comb (an actual barber’s comb would be ideal) and drag it vertically along the tapered section to see the "steps" that may be left behind by the guides (unless you were successful at sweeping upward in your cuts to blend the lengths). Use your clippers without a guide to carefully clipper off any "points" in the hair. You can also use your scissors for this purpose.
After blending the tapering, complete the look by using a safety razor (or a straight razor if you prefer) to clean up the perimeter of the haircut. This includes the nape of the neck and the sideburns.
©Hairfinder.com
See also:
Clipper cutting techniques for men's and boy's haircuts
How to cut hair with clippers
How to do taper cutting with clippers and scissors
How to fade hair with clippers