Long Hair Makeover

Straightening the Hair and Natural-Looking Make-Up
My friend, Jenn, and I have known each other for about six months. She's a stay-at-home mom with a 2-year-old and an entrepreneur with a small, folk-art crafts business. She stays busy, and admits that since the birth of her daughter, she really doesn't spend much time on herself.
Her hair is thick, coarse, and very curly. It hangs down past her shoulders and aside from using a little hair gel, (and some anti-frizz product I forced her to take) she doesn't do anything with her hair besides pull it back with a headband or a ponytail. She knows she needs to take care of herself, but after such a long time, she says she has no idea what she should do.
They also think that a make-over means a permanent change in the hair, either from cutting it short (for those with long hair) or changing the color, or texture (with a permanent wave). This doesn't have to be the case, and for Jenn, that was key to her being comfortable with the idea.
She wanted to get an idea of the possibilities available to her, WITHOUT making a commitment to the new look. Jenn wanted to see herself with a look that was fresh and natural-looking. Something she could wear to the crafts fairs and festivals where she does business, and would be comfortable wearing to the toddlers' activity classes her daughter is enrolled in.
So, I had my instruction: straighten the hair (but nothing permanent), give it a serviceable style, and make-up that would be natural-looking, but make her feel good about her appearance and hide the little flaws everyone has.
Step One: This first thing we did was shampoo and condition Jenn's hair. I also used an extra leave-in conditioner to ensure protection against heat damage and to detangle Jenn's hair. After combing the leave-in conditioner through the hair and making sure to remove any tangles, I divided the hair into three horizontal sections and began the blow-dry process. I used a concentrator attachment with combing tines on the dryer and a flat-paddle brush designed for "straight hair" to achieve good tension in the blow-out process.
Note: When blow-drying your hair, especially for the purpose of straightening out curl, remember to angle the dryer to blow in the direction of the hair growth. Doing this helps to keep the hair smooth during the drying process. In addition, you always want to make sure to keep the dryer moving to prevent overheating and possibly burning the hair.
It's imperative to use a good conditioning agent when performing heat styling. Blow dryers, curling wands, and flat irons can damage the hair if not used properly or if used on improperly protected hair. To get the best results with heat styling, use a leave-in conditioner in addition to your rinse-through, and always follow manufacturer guidelines with regard to the appliances you use.
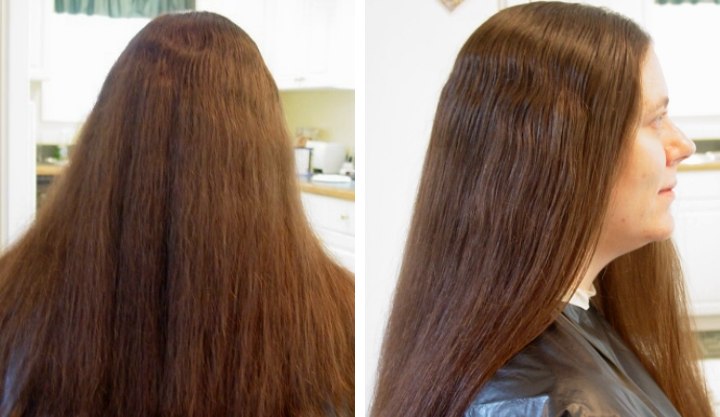
Jenn's hair responded well to the blow-out process, and was pretty straight by the time I finished. But as shown in the photos, it was still a bit "fluffy", and not the smooth, flat tresses which were our goal.
Step Two: After blowing the hair dry, I again sectioned the hair into horizontal divisions, and began the flat-ironing process. Working with first one side of the head, then another, this involved using a light mist of hairspray and ceramic plate flat iron on sections of hair approximately 1-to-1 1/2-inches deep. The flat iron smoothed out the "fluffiness" and allowed the hair to lie more smoothly on the shoulders.
The entire process of blow-drying and flat-iron straightening took about an hour and a half, because Jenn's hair is so long. The finished result of the thermal straightening process was smooth, silky tresses where once had been a mass of curls and frizz. Jenn also noted with pleasure that her new hair look had an added bonus by making her face appear slimmer.
©hairfinder.com
See also:
Jennifer's Face Makeover
More Hair Makeovers