The Twisted Knot
How To Create This Sophisticated Updo
One of the greatest advantages of having long hair is the wide range of up-styles you can create. These up-styles can vary from simple to intricate styles that may take hours to achieve. Updos are a classic choice for woman with long hair.
When done correctly, even a simple updo can elevate your evening look and give it a sophisticated and elegant touch. Here, I will demonstrate a quick and easy updo that appears very sophisticated.
If you find yourself having to work with freshly washed hair, there is a quick solution. Apply styling gel or setting lotion to damp hair and blow-dry it. Once it's dry, separate the hair into thin sections (around one to one-and-a-half inches wide) and lightly spray each section with hairspray. Allow the hairspray to dry, then brush out the hair once again. This should give your hair enough texture so that it's easier to style.
To begin the Twisted Knot:
NOTE: You will need large bobby pins, hairpins, combs, or hair accessories for decoration.
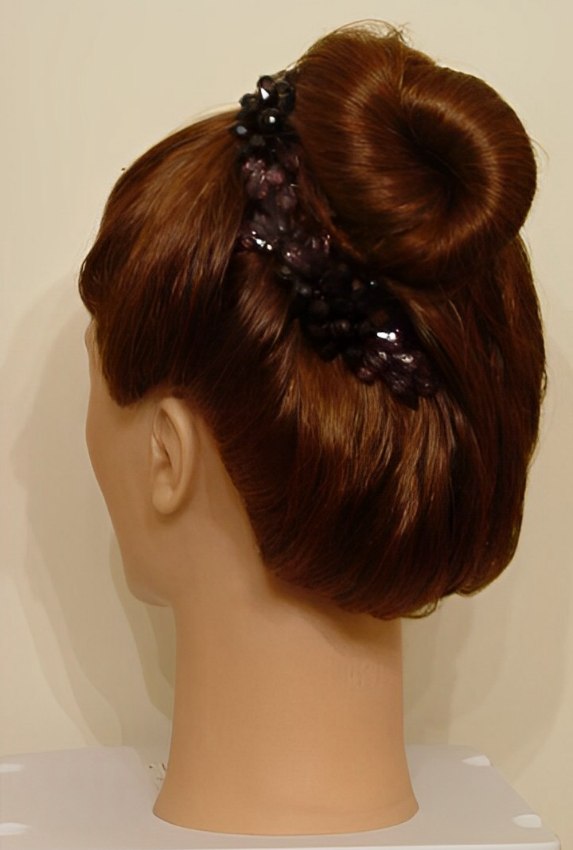
Bend forward and brush the hair forward from the back of the head to the front. Once the hair is smooth, gather it up in one hand as if you were going to create a topknot-style ponytail at the crown of the head.
Instead of binding the hair in an elastic band, hold it loosely just left of center, and begin twisting the hair in a counter-clockwise direction. As you twist, the hair will begin to form an upside-down U-shaped bend and tighten. Keep twisting and let the hair bend upward again until you reach the starting point of the twist.
Again, keep twisting, but lead the twist behind the initial "U" and follow it down, tucking it behind the knot that has been formed.
Once you reach the end of the hair and have hidden the ends from view, use two large bobby pins to secure the knot to the head by creating an "X" shape at the crown of the head behind the knot. Add more pins as necessary to firmly secure the knot in place. When inserting the pins, make sure the wavy side faces the scalp to provide grip and traction. Also, it's important that your first two pins form the "X" shape so that you can anchor additional pins to this base.
Once the knot is secured, you can add combs or other accessories as desired. Finish the style by using hairspray. Lightly mist the hair and gently pat down any loose strands or flyaway ends.
Unless you need to create texture in the hair you start with, this style can be achieved in under ten minutes. It's a straightforward style that still exudes elegance and sophistication. It's a useful trick to know when you need to dress to impress with little notice.
©Hairfinder.com
See also:
More hair styling instructions
More about up styles
Hairstyles for prom