Foil Highlighting (2)
Previous page
In L's case, there was an additional reason to be speedy: Because she wanted parts of the hair bleached and other parts colored, we needed to be sure that we finished quickly allowing the bleach to process properly on the last highlights without having to wait so long that we ran the danger of "over-processing" the first highlights.
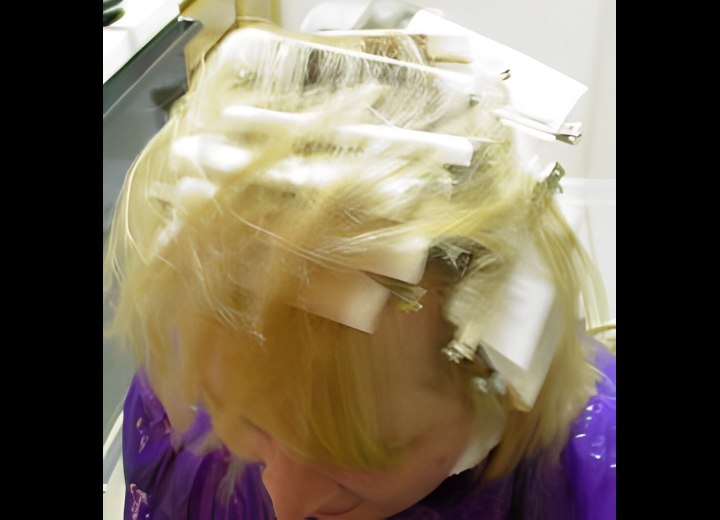
Once I was ready to begin, I put on my gloves and mixed the color and bleaching mix in separate bowls with separate brushes. After taking down the top section of hair and combing it to smooth it, I sliced a thin segment for the first highlight. The foils I used had been pre-cut to be approximately two inches longer than the hair I was working with.
Once the bleach was applied, I placed the brush back in its bowl and folded the foil in half, bringing the bottom half up to hold the bleaching hair between the folds. The sides were then folded in to enclose the hair segment. I used small clips to secure the foil and hold it out of the way while I proceeded to the next segment.
The next segment was to be a color segment, and I left an equally sized segment of hair the original color between each colored or bleached segment. I applied the color using foil as described above, and continued the process until the top section of hair was finished.
I kept working, adding bleach and color to foils on one side, then the other, and finally in the back of the head. Total application time was about 15-20 minutes. I set my timer for 15 minutes and waited for the color and bleach to process, keeping an eye on the bleached segments to make sure they didn't over-process and burn the hair. I used my own formula in mixing the bleach. I combined 2 tablespoons of bleach powder with 1 ounce of 20-volume cream developer and 1 ounce of deep conditioning treatment. Because L's hair had been lightened previously and repeatedly, I wanted to make extra sure to make the bleach as gentle as possible while still being effective.
Once the time was up, I carefully removed the foils and thoroughly rinsed the hair with warm water. I patted the hair to remove the excess moisture and applied an after-color conditioning treatment to the hair and put a plastic cap over it. The hair was allowed to sit under the cap for another 20 minutes.
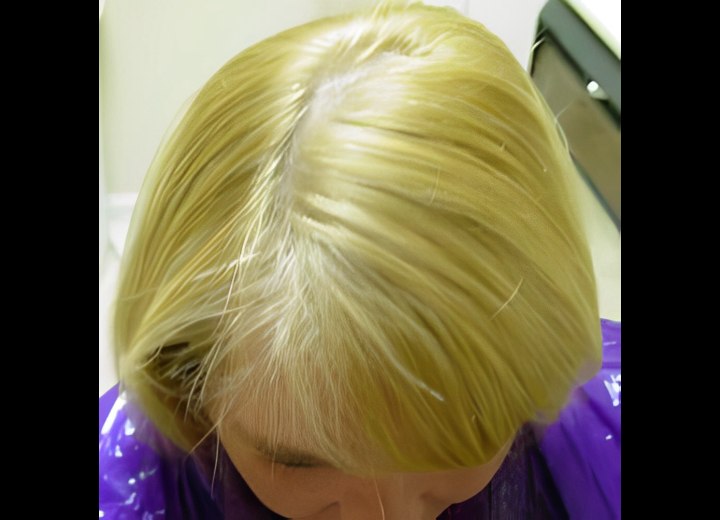
Finally, it was time to rinse the hair of the conditioner. L's hair had been a bit rough-feeling when the coloring/bleaching process was done, but was now smooth and silky. I towel-dried the hair one more time, removed any tangles using a wide-tooth comb and finished drying the hair with a blow-dryer, and styled it with a round brush.
As you can see from the photos, L's hair had started out being somewhat dull and monotone. After the foil coloring, we see the alternating bands of original color, highlights, and spice color. She was very pleased with the result and very glad that I had talked her out of going with the darker red color she had initially requested.
Hopefully, this will help you understand the process involved in foil coloring techniques and perhaps keep you from being afraid of trying them for your own "simple" coloring ideas. I don't recommend trying to perform this technique on yourself, but perhaps you and a friend can try it out with each other.
Once again, I do not recommend this as a "DIY" project except in cases where you are working with simple highlights using a hair color formula (not bleach). The risk is great enough that you might damage your hair using the bleach to do foil highlights because of the time it takes to apply the foils that it is worth the expense to have these processes done by a professional. And applying multiple colors has the same time issue: You won't be saving money if the foils take you so long to apply that your color goes inactive.
©Hairfinder.com
See also:
Can I use regular aluminum foil to foil highlight hair?
When were foils invinted or first used?
