How to Cut a Choppy Pixie
The pixie cut is another of the more common cuts of recent eras. Super-short, gamine cuts became popular in the 1960s with actresses like Mia Farrow and models like Twiggy, and soon became all the rage as women began to assert their independence and preferences for easy-care hair. Of course, the fact that these styles accentuated their fashionable cheekbones and made their eyes really stand out was not lost on the flirtatious females of the period.
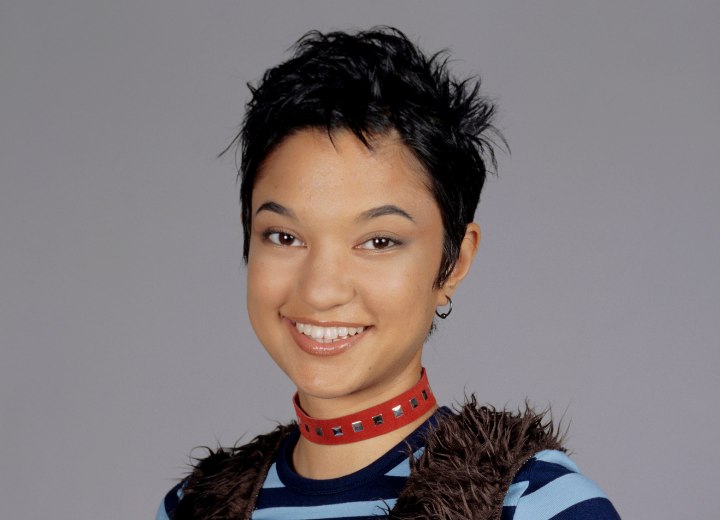
Today's gamine pixie haircuts are sometimes even shorter than they were traditionally, but the fundamentals of the cut remain the same. Generally speaking, today's pixie cuts follow the short back and sides pattern of traditional men's cuts, but tend to elongate the "neckline" and "sideburns". In many cases, these areas are rounded and/or feathered to create soft accents in the style. The interior layers are generally uniform, and may taper from slightly longer in the top and crown areas to shorter and closer-lying at the perimeter hairline.
In point-cutting the hair is lifted away from the scalp and the scissors are used to make small notches in the ends of the hair segments, creating "points" in the layers. These points become more pronounced when the hair is damp or when certain "wet-look" styling products are used.
As mentioned, the pixie cut is fairly straightforward. Unless you’re starting with a head of hair that is very long, you don’t even really need to section the hair to begin working. It is recommended, however, if the hair is long or if it is very dense, as this will make it easier to work with and keep novices from feeling that the hair is out of control.
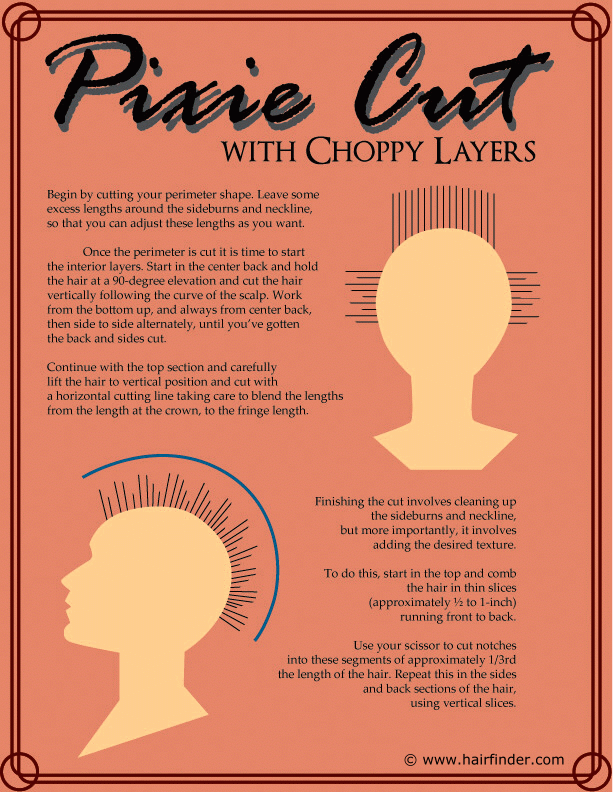
Begin by cutting your perimeter shape. Begin in the forehead area and cut the fringe to the length you desire and that will flatter the individual. Leave some extra length around the sideburns and neckline, so that you can adjust these lengths as a finishing step and create the look you want.
In fact, when cutting a super-short cut like the pixie, it’s always best to err on the side of caution. In most cases, you want the hair damp when cutting it and the hair will become shorter as it dries. If you cut it short while it's damp, you may not be happy with the result once it dries. And while you can always cut it shorter, only time will make it grow.
Once the perimeter is cut, it is time to start the interior layers. Start in the center back and hold the hair at a 90-degree elevation and cut the hair vertically following the curve of the scalp. These interior layers can be shorter than the outermost edge of the perimeter. Just make sure you blend these lengths to avoid any obvious lines. Alternate cutting between the right and left sides as you go, in order to keep the lengths even.
With such short lengths as are common to the pixie cut, you may want to use a "rule" to help you keep the lengths under control. This can be your comb if it has measurements for length, or you could simply use a certain number of finger-widths of your holding hand to measure the hair for cutting. Be aware that some individuals have asymmetrical features (an ear lower on one side, etc.) which can make the use of these landmarks unreliable.

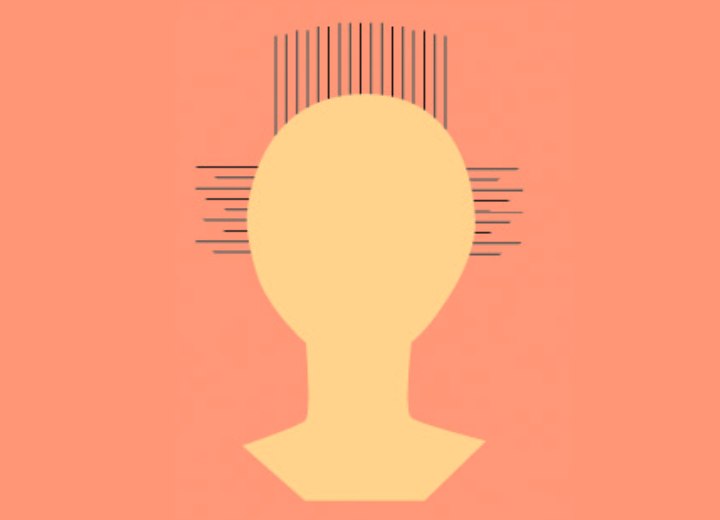
Work from the bottom up, and always from center back, then side to side alternately, until you’ve gotten the back and sides cut. Continue with the top section and carefully lift the hair to a vertical position and cut with a horizontal cutting line, taking care to blend the lengths from the length at the crown to the fringe length. This blending can be a gradual progression from crown to fringe, or the transition may occur in the first few inches. The decision depends on personal preferences.
Finishing the cut involves cleaning up the sideburns and neckline, creating the effects desired there. But more importantly, it involves adding the desired texture. To do this, start at the top and comb the hair in thin sections (approximately ½ to 1-inch) running from front to back.
Use your scissors to cut notches into these segments of approximately 1/3 of the length of the hair. Repeat this in the sides and back sections of the hair, using vertical slices. Keep the hair moistened and run your fingers through the sections as you finish them to check the level of texture created. Make adjustments as needed.
Finish by applying the desired styling product and blow-drying with a diffuser to a mostly-dry state. If the hair gets too dry, just mist it with spray or product and finger-comb it.
©Hairfinder.com
