Smooth Up-style
Up-styles are always popular, and everyone is always looking for something "new" and "different" in their updos. And just as overall style trends change through the years, so do the specific variants of those styles. In fact, such changes always occur in small increments. Little adaptations to existing styles lead inevitably to new looks as time passes. Updos are just the same.
In the 1980s, most updos were characterized by puffed up bangs, and frilly twists and spiraling accent curls. As the 1980s passed into the 1990s, the puffs and frills got smaller and smaller, and more detailed styles became the fashion. Today's up-styles tend to be smoother, sleeker, with a cleaner, more sophisticated look to them. But perhaps that opinion is colored by the telescoping effect of looking back at styles.
Creating the Style:
We begin our demonstration on a manikin with unwashed hair. We mist the manikin's hair with a leave-in conditioner and use a blow-dryer and a flat paddle brush to dry it smooth and straight. The manikin's head is tilted forward and the hair is combed outward from the center of the crown area, allowing the natural parting of the hair to assert itself. Our manikin's natural part is to the left of center. If your client doesn't have such a parting you will want to create one, or adjust the final stages of the style accordingly.
Once the hair has been combed smooth, section out a circular shape of hair centered at the crown of the head. This hair will form our "base" and will be the anchoring point upon which we will build the layers of our up-style. Divide this circular section into two sections vertically. Holding the two sections as if you were going to make ponytails of them, tie the sections together into a square knot with the knot itself resting gently against the scalp. There is no need to pull the knot tight, as it will not hold.
Use two large bobby pins and anchor the knot to the scalp by positioning them crosswise onto one another. Allow the free ends of the knotted hair to continue going in the direction dictated by the knot, wrapping them in a circular sweep around the knot. Before the ends become sparse, and to prevent a frayed look to the finished style, clip a bobby pin onto the strand ends, flip the pin so that its ridged side is facing the scalp, and clip it into position at the base of the knot. Using the tail of a tail comb, gently tuck the hair ends underneath the curve of hair you just formed. Spray lightly with hairspray and gently pat the hair to smooth down any stray strands.

Now, begin slicing long, thin sections of hair from the sides of the head at the ears, alternating between one side and the other. Take these sliced sections and mist them with spray, comb them smooth, and sweep them across and around the crown of the head. Use the "clip, flip, and slip" method to pin the sections into place, carefully tucking the ends out of sight and spraying and patting the sections to smooth down strays.
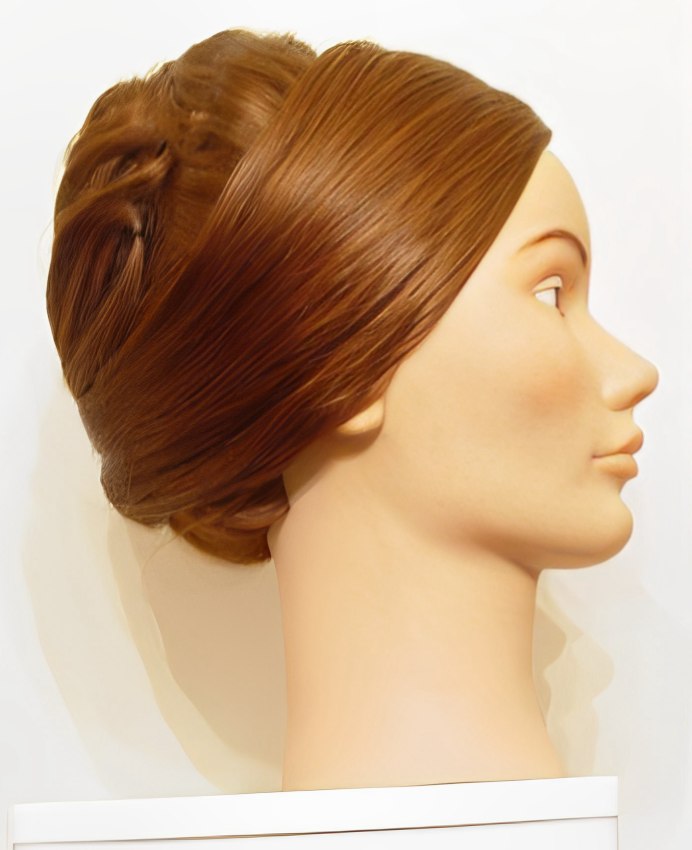
Work your way from the sides to the nape of the neck in this fashion, creating layer upon layer of upswept sections. Position the overlapping layers as desired, to maintain the balance of the style on the head. When you've placed the last section of hair at the nape of the neck, all that should remain are a small section of hair to the left of the part, and a larger section of hair across the top to the right of the part.
Carefully mist the left side section of hair and comb it smoothly along the hairline and anchor it at the back of the head along the lower right side of the crown area. As this and the top section of hair are the final touches of this style, be especially conscientious to make the section smooth. Once you're happy with this section's placement and the concealment of the ends of the section, proceed to the top and final section for placement.

This last section is larger than the others you will have handled, and should be sprayed with hairspray and combed into a wide, smooth ribbon of hair. Wrap this section along the hairline at the right side of the head, down around the lower crown and anchor it as you did the others on the lower left side of the crown. Pay special attention to "clipping, flipping, and slipping" the bobby pin anchoring this section, so that you can hide the pin and tuck the end of the section out of sight. Spray the section again with hairspray and gently smooth it to make sure there are no stray hairs sticking out.
In our demo, we have used two jeweled combs tucked behind one another for decoration on top of the style behind the parting, but a variety of adornments could be used, provided they aren't overbalancing and are able to attach themselves along the scalp. Jeweled pins or barrettes, a small tiara, or even a small spray of flowers would work if appropriate to the occasion.
The result is a style with a smooth finish, and an elegant look, and the staying power to handle virtually any evening celebratory activity or occasion.
©Hairfinder.com
See also:
More about up-styles
Up-style for medium length hair
Twisted knot up-style
